LED blink using ARDUINO and Bluetooth module HC-05
This post is about basic LED blink using an Arduino Board and a Bluetooth module HC-05 (shown below).
We have already discussed the basic features of Arduino UNO briefly in a previous post (https://younguttarakhandgadget.blogspot.com/2018/09/what-is-arduino.html).
So a basic LED blink program is an inbuilt example in Arduino
IDE named ‘BLINK’. (Open IDE, go to File> Examples> Basics> BLINK).
If you are new to
Arduino boards, you must start with LED blink program to understand the basic
structure of a program. We will discuss BLINK program in another post.
Components Required:
Connection Diagram:
The following diagram shows the connection diagram of this
project. For convenience we are using INBUILT LED of Arduino UNO board (Pin
number 13 on board). You can connect an external LED to pin 13 and Ground (GND)
as shown in diagram for better understanding.
(NOTE: connect a resistor of 1k to positive leg of LED to
avoid any damage. Positive leg of LED is longer than Negative leg).
HC-05 Connections:
HC-05 Bluetooth Module has total 6 pins out of which only 4 pins are to be used
for this project. The detail of pin connection is given below:
TX pin- connected to
RX pin of Arduino UNO
RX pin- connected to
TX pin of Arduino UNO
GND pin- connected to
GND pin of Arduino UNO
5V pin- connected to
3.3V pin of Arduino UNO.
NOTE: HC-05 module has 5V printed on it but it is
recommended to connect it to 3.3V supply to avoid any damage to the Bluetooth
module.
Arduino IDE and Code:
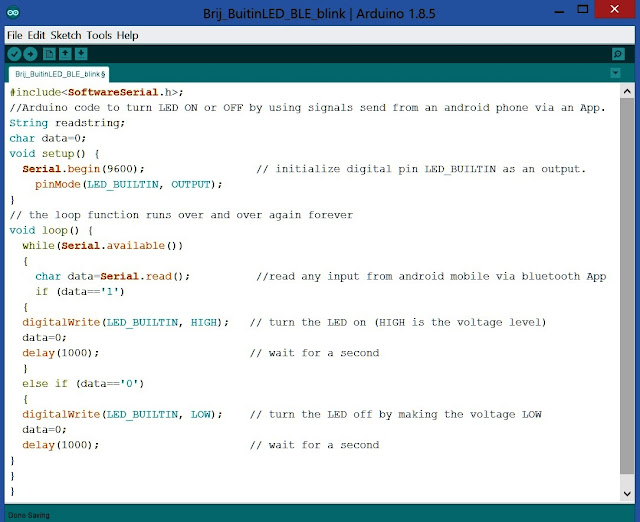
The following code must be burned to Arduino UNO board using Arduino IDE (I have used IDE version 1.8.5).
- Connect Arduino UNO to your Computer/Laptop using USB cable.
- Open IDE, go to Tools>Port> COM3. Please click on COM3 if not selected. Also COM3 name is the port name in my system, its name might be different in your computer/laptop. Please tick it.
- Again go to Tools> Boards> Arduino/Genuine UNO. Select your board to be Arduino UNO.
- Now open a new program from File> New and write the given Arduino code to this blank program. Save this program as “LEDblinkBLE” (or a name of your choice).
- Next Go to Sketch> Verify/compile and verify the program. After successful compilation, program is ready for upload to Arduino UNO board.
- Now go to Sketch> Upload and burn the program to your UNO board. Wait till program uploading is complete.
Now your board is ready to turn LED On or Off by receiving
commands from your Android mobile App.
NOTE: The app used in this project have been downloaded from
google playstore and the link is given below.
Arduino bluetooth controller https://play.google.com/store/
I hope this project will help you understand basics of
wireless LED blink control using Bluetooth. Best wishes for your project.
**Disclaimer:The pictures of of LED, HC-05, Arduino Uno have been taken from internet and the author does not claim ownership of these pictures. Pictures are used for reference purpose.


Comments
Post a Comment